ClipPathとは
画面上に表示されるウェジェットの形状を設定するためのウィジェット。
任意の形状に設定できるため、既存のウィジェットには無いカスタム性が高いUIを作りたい時に使用する。
使い方
以下の流れで使用する。
- ウィジェットを
ClipPathでラップ CustomClipper<Path>を継承したclipperクラスを作成(ここで形状を決める)- clipperクラスを
ClipPath.clipperに指定
以下のウィジェットをベースに、三角形、台形、曲線状に凹んだ正方形、星型を作成する。

child: Container(
  color: Colors.lightGreen,
  height: 200,
  width: 200,
),
なお「ウィジェットをClipPathでラップ」は形状によらず共通で、次の様に記述する。
ウィジェットをClipPathでラップ
ClipPath(
  child: Container(
    color: Colors.lightGreen,
    height: 200,
    width: 200,
  ),
  clipper: // clipperクラスを指定
)
CustomClipperを継承したclipperクラスを作成
形状を決めるためにはCustomClipper<Path>を継承したクラスが必要。
継承時には2つのメソッドをオーバーライドする。
class MyClipper extends CustomClipper<Path> {
  @override
  getClip(Size size) {
    // 形状を指定するpathを返す
  }

  @override
  bool shouldReclip(covariant CustomClipper oldClipper) {
    // clipperが変わらない場合はfalse、変わる場合はtrue
    return false;
  }
}
以下で形状別にgetClipの中身がどのようになるかを示す。
三角形

getClip(Size size) {
  var path = Path();

  path.moveTo(size.width / 2, 0);
  path.lineTo(0.0, size.height);
  path.lineTo(size.width, size.height);

  path.close();

  return path;
}
ポイント
- 切り取りパス作成用インスタンス
pathをまず作成 moveTo(x座標, y座標)で切り取りパスを開始地点に移動lineTo(x座標, y座標)で直線で切り取りclose()で現在地点と開始地点を直線で結びパスを決定
台形

getClip(Size size) {
  var path = Path();

  path.moveTo(size.width / 4, 0);
  path.lineTo(0.0, size.height);
  path.lineTo(size.width, size.height);
  path.lineTo(size.width * 3 / 4, 0);

  path.close();

  return path;
}
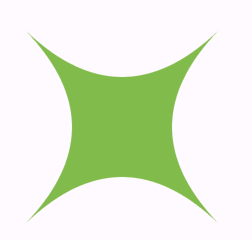
曲線状に凹んだ正方形

getClip(Size size) {
  var path = Path();

  final commonControlPoint = Offset(size.width / 2, size.height / 2);

  final firstPoint = Offset(0, size.height);
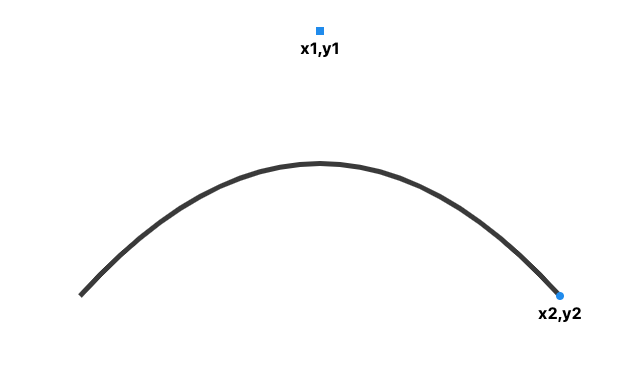
  path.quadraticBezierTo(commonControlPoint.dx, commonControlPoint.dy,
      firstPoint.dx, firstPoint.dy);
  final secondPoint = Offset(size.width, size.height);
  path.quadraticBezierTo(commonControlPoint.dx, commonControlPoint.dy,
      secondPoint.dx, secondPoint.dy);
  final thirdPoint = Offset(size.width, 0);
  path.quadraticBezierTo(commonControlPoint.dx, commonControlPoint.dy,
      thirdPoint.dx, thirdPoint.dy);
  final fourthPoint = Offset(0, 0);
  path.quadraticBezierTo(commonControlPoint.dx, commonControlPoint.dy,
      fourthPoint.dx, fourthPoint.dy);

  path.close();

  return path;
}
ポイント

星型

getClip(Size size) {
  var path = Path();
  path.lineTo(size.width * 0.5, size.height * 0);
  path.lineTo(size.width * 0.39, size.height * 0.35);
  path.lineTo(size.width * 0.02, size.height * 0.35);
  path.lineTo(size.width * 0.32, size.height * 0.57);
  path.lineTo(size.width * 0.21, size.height * 0.91);
  path.lineTo(size.width * 0.5, size.height * 0.7);
  path.lineTo(size.width * 0.79, size.height * 0.91);
  path.lineTo(size.width * 0.68, size.height * 0.57);
  path.lineTo(size.width * 0.98, size.height * 0.35);
  path.lineTo(size.width * 0.61, size.height * 0.35);
  path.lineTo(size.width * 0.5, size.height * 0);
  path.close();
  return path;
}
ポイント
- 星型を切り取る際のpathの位置指定は以下のサイトを参考にした。
clipperクラスをClipPath.clipperに指定
作成したclipperクラスをClipPath.clipperに指定する。
例えばStarClipperクラスの場合次の様になる。
ClipPath(
  child: Container(
    color: Colors.lightGreen,
    height: 200,
    width: 200,
  ),
  clipper: StarClipper(), // clipperを指定
),